
How do you press the foliage and flowers you print from?
- Su France

- Aug 8, 2023
- 8 min read
Updated: Aug 11, 2023


How to press foliage and flowers in easy steps
Throughout the seasons I take many photos of nature in my garden and the areas where we walk. I use them as inspiration and reference, sometimes just because I like the looking through the lens, focusing on tiny details which may otherwise go overlooked.
When I started I began to see how many creatures use places as their habitat and recognise interconnectedness. It's also awe inspiring to view knots in wood which resemble fairy tale eyes, or notice how a bee sleeps within flower petals.
Sometimes, left to ruminate, these photographs reemerge in the form of a new print.
Some of the print methods I use rely on the photographic process, with UV light exposure, as in the solar plates I print from.

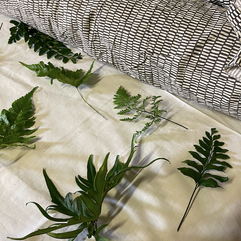
Some of the plants I print with I have conditioned in various ways. The skeletal hosta leaf you see here, gave me a new nickname at home, 'Swamp girl' as I left the original leaf in water, over weeks and weeks, so the removing the the mesophyll leaf tissue, which consists of several layers of green cells without damaging the intricately laced veins.
I have discovered that not all leaves will withstand this process but perhaps thats for another blog post.
A Simple Joy- Pressing Flowers
Pressing flowers is simple way to preserve beautiful flowers and foliage so you can enjoy their beauty all year long. I have pressed the leaves from our fig trees, which a friend then used to make a gently scented table runner for her Christmas table. (Do be aware that if you do cut fig leaves the sap can be an irritant to skin, so take extra care).

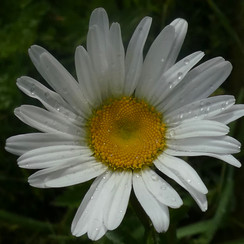
My mum in law gave me one of her old, wild flower identification books and when I opened it there was a sweet love token with a message from her husband a precious daisy, will holding some of its original summer colours. I returned the items to show her and the daisy not only held colours some of its original vibrancy but also a treasured memory as she knew exactly when and where she was given the little flower and note.
Some delicate flowers and leaves press very simply between book pages and bring back childhood memories of doing the same. Apparently flower pressing has been around since early civilisations attempted to send pressed garlands with loved ones to the next life and I can recall many a National Trust visit as a child, showing that the Victorians seemed to think of it as a very fashionable pass time. It definitely focuses you on the importance of patience, concentration and living in harmony with nature.
The pressed plants can be used for a variety of decorative purposes. I'll explain the basic steps I use for pressing flowers using common plants and foliage found right here in the UK, or more specifically that I find and grow in my Lincolnshire garden and farm.
Gathering Flowers & Foliage
The first step is to go out and collect some flowers and foliage to press, thinking about what you aim to use them for, once they're pressed.
Obviously, only pick from places you have permission, but the actual collecting becomes be a mindful task in itself. Under the Wildlife and Countryside Act 1981, be respectful of the fact that it is unlawful to uproot any wild plant without permission from the landowner and in some cases even the landowner themselves cannot without permission. There is an interesting article written here by Ricard Prideaux of 'Foraging and Wild Food,' about the legalities. In his post, he aims to 'pick out the relevant parts of the legislation and steer a forager, bush-crafter or ethnobotanist in what is (hopefully) the right direction.'
I myself try to collect botanicals when the vegetation is dry and by that I mean not just after a downpour, rather than when they're dried out.
The foliage still needs to be malleable, not necessarily green, (as I've had success with browned seed-heads) but not so sun-dried that leaves are fragile that they crumble in your hands.
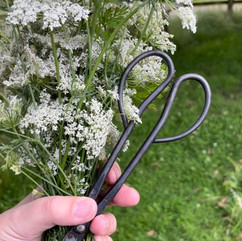
As I pick, I ensure I don't take too much of a plant, as I want it to be able to naturally seed and continues its cycle. I pick with small scissors but often snip stems with just my fingernails as you're then more aware of the act of 'taking.' I aim only to take what I will use and this helps me to look more closely, being descisive; thinking about why I prefer this stem to that one. Being aware of where I'm treading and that I'm in a habitat is also at the forefront of my mind. I want to feel 'a part of nature; not apart from it'. Putting what I gather down for a few minutes, with some foliage allows creatures to scuttle off and I also check the undersides of leaves, to see if theres anything which needs gently rehousing. There are however organisms I will not be able to see so this is in my mind too. You just have to watch the 2019 film, 'Fantastic Fungi' about the mycelium network under our feet on a woodland walk to recognise this.


Some plant varieties to press:
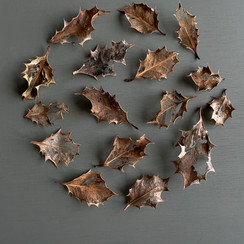
Wildflowers and leaves- Poppies, daisies, nipplewort, brambles, oak, ash, small leaved lime, flowering grasses, dock flower, holly, maple
Garden foliage/flowers - Hydrangeas, lavender, willow, holly, umbellifers, lily of the valley,
Herbs - Lavender, rosemary, thyme, sage and tarragon
Ferns and ivy - Delicate, lacy ferns and ivy vines provide some of my favourite greenery
It's best to gather flowers in the morning, when they are fully open and most vibrant (if you wish to preserve colour). Select flowers that are free of mud too - although I have been know to print the roots of plants and simply gently hand wash the soil off.
Preparing the Flowers
Once you've gathered your flowers, the next step is to prepare them for pressing:
Edit/Strip off any leaves/flower heads that will be unwanted after the pressing stage. Some flower heads are bulky so you can even cut them in half- it sounds brutal but it makes an image more readable and less confusing and helps it successfully press. Hold the flower vertically to make the cut.
Sort the flowers and greenery into small bunches.
Gently wash off any soil. Pat dry with a paper towel.
Pressing the Flowers -how do you press the foliage and flowers you print from?
Now it's time to press the flowers between sheets of absorbent paper or fabric:
Place a sheet of paper down (I use tissue - lots collected from postal deliveries and also old softened bedsheet or shirts, as long as the fabric isn't textured. I have also used blotting paper but its an expensive option) on the pressing surface. Ensure it's crease free as these will transfer to the pressed botanicals. Sometimes leaves or petal curl before I press them and I like the impressions they make to look natural rather than contorted so in my work you will see these details.
Arrange a flowers and greenery on the paper or fabric. Leave space between blooms
Top with another sheet of absorbent paper. I also have layers of woollen blankets between mine.
Continue layering flowers between sheets of paper.
Finish with a top layer of paper.


Applying Pressure
An essential step is applying ample pressure to flatten and dry the flowers:
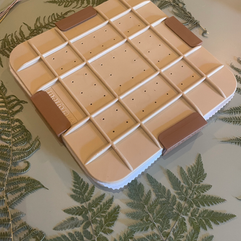
Place pressed flowers between two hard surfaces like boards. My largest 70cm square presses are FSC Forest Stewardship Council® wooden boards from B&Q, but I also press some foliage under rugs, In fact, at some parts of the year, downstairs we have oak floor boards and almost every rug had some form of greenery pressing between sheets.
Weigh down the top board with heavy objects- a rug!, other flower presses (if like me your doing multiple pressing simultaneously) a few books, a cobble- anything to give that pressure you'll need.
As some of my boards are rather large I also use clamps to add that extra contact and pressure. I started off using G clamps but to speed me up I now use those you can see in the picture (I don'y know their name), adding one to each edge of the board.
Flowers with thick petals like or complex seed heads, may need more weight. You can also cut off some of the bulk of a flower head.
Replenish paper or fabric if it gets too damp. I wash my fabric, as it needs it and its great that my favourite bed sheets now have a new, if rather unusual, life.
I use a variety of presses

My presses include those with home made FSC boards, a screw press made with wingnuts, rug presses (thats a thing now but be sure to add paper to protect your floor and the underside of the rug, a 'Microfelur' (we no longer own a microwave, however the mini press, first intended to speed up the dying process, with the sandwich of blankets, is still useful for tiny pressings.
I am also lucky enough to have been gifted a previously unwanted and now much loved, book press. The grey, woollen blankets I cut to size for this press had their first incarnation in an art gallery exhibition, so came clean, thankfully cheaper and unmarked. It's good to recycle and be a Womble as much as you can, don't you think?
Leave your 'in progress' pressing for 2-6 weeks...ish... vague because the thickness and form of plants are different, as are the conditions for pressing at various times of the year. There are some plants I have found which 'press too well' or require less pressure if you are to gain details of leafy veins etc through printing, so I have learnt to 'play around' with this, depending on the plant.
You can peak at your botanicals during the pressing process and put back if you need to! Marine plants and fleshy botanicals can take much longer.
I make a record of what I keep in the various presses I have, so I know how long they have been there and whats in each. It is easy (for me) to forget! I cross them off as each thing is retrieved for use and I have even photographed these records as It may inform me if and when I press similar plants in future.


The key is applying even pressure to flatten the flowers as they dry slowly over weeks, with absorbent fabric or paper to withdraw the moisture away from the plant.
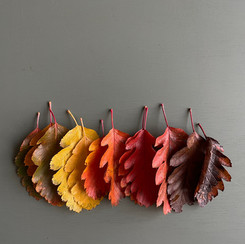
Some specimen will lose some of the vibrancy, while others will surprise you with the colours that remain long after the botanical has dried. Obviously, for me a lack of colour on the pressed botanical doesn’t matter as I use my pressed material to ink up and print with.
Drying and Preserving
Once dried, you can preserve and display your pressed flowers:
Carefully remove flowers and brush away dried material.
Store in a moisture free environment.
Mine are in recycled card boxes, each labelled so I have easy access and I Keep larger specimen in drawers, which when opened make me feel like one of those Victorian plant collectors I have read about in books.
My treasured pressed flowers are then ready for me to use in my printing on my etching press or to take with me on the courses I run so others may use them in their designs .
You will find all sorts of other methods for pressing- these are the methods which I currently do in my shed studio, at the bottom of my garden; simple, hands on, with no chemical intervention. I hope that some tips have been helpful.
Following these steps, you can press a variety of colourful flowers and greenery gathered and curated from gardens and countryside, to make beautiful projects you can cherish for years to come.
Examples of my creations using beautiful pressed flowers and leaves


I create one-off prints (intaglio mono prints) and also use my rolling mill to make delicate impressions on sterling silver for the jewellery I form, using the unique treasures from nature which come out of my press.
Have a look at the prints currently available to buy in my online shop. Many of them will be using these pressing methods and when the next person asks me how long a print has taken to create I may now have a few different versions of my answer!


Comments